Monday, August 27, 2007

Crispy Chicken Costoletta


Crispy Chicken Costoletta, originally uploaded by mud pie gourmet.

I like to think I was one of the first to discover The Cheesecake Factory on the East coast. We would frequent the only one in the D.C. area and would even pay the horrible 10% tax back in the day. I have so many great memories that are formed around The Cheesecake Factory--waiting outside for a table and entertaining ourselves by super-gluing a quarter to the sidewalk just outside the door and watching people try to pick it up, and using the $100 to pay that someone gave us while driving on Route 95 as we were heading up to Baltimore's Inner Harbor's Cheesecake Factory (That is a crazy story). While in college we would make the 4 1/2 hour drive to Vegas to be able to go to The Cheesecake Factory at Caesar's palace.

As my sister, Mary and I were original patrons we took many a Virgin Cheesecake Factory customer. We soon discovered 4 things that everyone would say the first time they went to The Cheesecake Factory: 1) After almost spilling their water, "Whoa, this cup is a lot lighter than it looks." 2) "This menu is huge!" 3) After seeing an attractive girl in an ad in the menu, "I'll take one of those." and 4)after completing their meal and looking at the Cheesecake choices, "This really IS the Cheesecake Factory!"

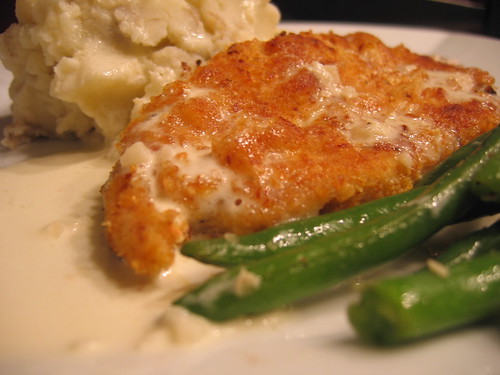
Unfortunately, we haven't been as happy with the Cheesecake Factory the past few times we have gone. Mostly bad service, but there are so many great restaurants in the D.C. area we usually just try something new (latest: Central.). There is one dish that I was craving so this recipe is inspired by their Crispy Chicken Costolleta. I'm not saying it is a direct match, because I haven't eaten it in months. My sister-in-law, Amanda recommends this to everyone who goes to The Factory, and they all love it! This is for you, Amanda!

Crispy Chicken Costolleta

(Copycat of the Cheesecake Factory's Crispy Chicken Costolleta)

Serves 4

Crispy Chicken

4 chicken breasts, cut horizontally, and pounded to about 1/4 inch thick, or use chicken cutlets.
Lemon zest of 2 lemons
1 1/2 cups plain bread crumbs or panko
2 Tablespoons Freshly grated Parmesan (optional)
2 eggs, whisked with 2 T water
3 Tablespoons flour
1 tsp ground pepper
1 tsp kosher salt

Preheat oven to 200 degrees.

Zest two lemons. Bake zest for about 5 minutes until dry. On one paper plate combine flour, pepper and salt. On another paper plate combine eggs and water, whisk until combined. On another paper plate combine dry lemon zest, bread crumbs and cheese. Place pounded chicken in the flour, coating well, followed by the egg mixture and the bread crumbs. Heat 2 Tablespoons olive oil and 1 Tablespoon butter in a large frying pan over medium heat. Place chicken in pan and cook on each side about 5 minutes until middle is no longer pink. You will need to work in batches, adding more oil and butter as needed. Keep chicken warm in oven at 250 degrees.

Lemon Sauce


2 garlic cloves, finely minced
1 tablespoon canola oil
2 cups heavy whipping cream
1 tablespoon Dijon mustard
1/4 cup plus 1 T fresh lemon juice
1/8 cup chicken stock
Kosher salt
Freshly ground pepper
1 tablespoon unsalted butter

Over medium heat in a fairly large saucepan heat canola oil. Add minced garlic and saute about 3 minutes. Add whipping cream and boil until reduced by one-third. Add Dijon, lemon juice, chicken stock and salt and pepper to taste. Simmer about 5 minutes. Remove from heat and stir in butter until melted.

Serve chicken with lemon sauce and mashed garlic potatoes.

Our Menu:
Crispy Chicken Costoletta
Lemon Sauce
Garlic Mashed Potatoes
Almond Garlic Green Beans
Mozzarella, Basil, Tomato Stacks
Fresh Fruit

Tuesday, August 21, 2007

Caterering for your Caterer

We just celebrated our seventh anniversary on Sunday. After dating for a couple of years, we were only engaged for 2 months. I had graduated college and was planning on staying in the East while S. had to return to school out West. We decided instead of having a long distance engagement we would just give our mothers heart attacks and get married quickly. Thanks to my mom, family (including the new in-laws) and friends the reception was a success. One family friend, Gaynell, catered for us and at least took that burden off of my mother. Her food is divine. I should say that our reception was a success, with one minor disaster. We arrived at the church where our reception was being held and my mother-in-law came out and told us our three layer cake had completely fallen over. My mother was freaking out a little, but we just laughed. I asked if anyone took a picture. No luck. Well, with some fancy skills the extra flat cakes were set up on pillars at different heights and it was once again presentable. In fact, many people said, "Oh, I saw that in Martha Stewart this month!"

Well, a couple of weeks ago my mom hosted an Open House for our caterer because she and her husband were moving from Virginia after 20+ years. I helped with some of the food. I was ecstatic when Gaynell took notice of my contributions. For S.'s 30th birthday in January we had an "Appetizer Dinner Party." I made these Beef and Balsamic Onion Baguette Stacks for that party as well. They are great to make ahead, and feed a lot of people.

Balsamic Beef and Onion Baguette Stacks


London Broil Marinade


1 1/2 lb London Broil
3 garlic cloves, minced
2 lemons, juiced, peel chopped
1/4 cup olive oil
1/4 cup balsamic vinegar
1 bay leaf, crumbled
Kosher Salt and Freshly Ground Pepper

Marinate London Broil 2 hours to overnight. Preheat grill to high heat. Place meat on grill and sear both sides. Lower heat to medium and grill both sides for about 15 minutes or until desired pink. Place in aluminum foil and let rest. Slice meat very thinly and set aside (You can do this up to 2 days in advance. Cover and refrigerate).

Balsamic Onions


3 Tablespoons Olive Oil
1 yellow onion, thinly sliced
1 red onion, thinly sliced
2 garlic cloves, minced
2 Tablespoons balsamic vinegar
Kosher salt to taste

Heat olive oil over medium heat. Add sliced onions and saute until tender, about 10 minutes. Add garlic, saute 1 minute more. Add balsamic vinegar and coat onions and garlic. Cook for about 5 minutes more. Remove from heat. (You can prepare this up to two days in advance. Cover and refrigerate).

To assemble:

Makes about 40 appetizers

1 baguette, very thinly sliced
Marinated London Broil
Balsamic Onions
About 40 fresh basil leaves
Feta, crumbled


On the baguette place sliced London Broil, sauteed onions, then basil, topped with about 1/2 tsp crumbled feta. Serve immediately once assembled.

Thursday, August 16, 2007

Taco Zucchini Bread

My brother, Craig grew some huge zucchini in his garden this year and I finally got around to making zucchini bread with it. I love zucchini bread. It is connected to my childhood--my mother would always make multiple batches to give away and freeze the rest and I would sneak them for breakfast. Mmmm, cold zucchini bread with cold milk.

My father made one thing for dinner when I was growing up--Soft corn tacos with meat. He would heat oil and fry the corn tortillas just until they were soft. Afterwards he would pore the oil back into the original bottle before getting rid of it. Enter, my sister, Jeannie. She decides to make some zucchini bread. She grabs the bottle to put the required oil into her recipe. The hot zucchini bread comes out of the oven and we all dig in. And we all quickly spit it out. Jeannie had used the taco oil in her zucchini bread on accident--not a good combination. It's a wonder I still eat zucchini bread today.

I have come up with a recipe that is yummy and healthy and I can rationalize eating it for breakfast with that big glass of milk. When we were making it Boo asked me when we eat it. She didn't know if it was a dessert, bread that goes with dinner, or what. My answer? ANYTIME!I

Whole Wheat Zucchini Bread


2 cups whole wheat (I use King Arthur's White Whole Wheat)
1 1/2 tsp cinnamon
1 tsp baking soda
1/2 tsp salt (I use kosher)
1/4 tsp baking powder

1/2 cup olive oil
1 1/4 cup sugar
1 1/4 cup shredded zucchini
2 eggs
1/2 tsp lemon zest
1/2 cup finely chopped pecans (optional)

Preheat oven to 350 degrees. Grease 3 small bread pans (2 1/2 X 5 1/2--you could use one large pan, but I love the crusty parts so the smaller the better).

Combine dry ingredients in a medium bowl. In a separate bowl combine oil, sugar, zucchini, eggs, and zest and mix. Add dry ingredients just until combined, add pecans, if desired. Pour into bread pans. Cook for 35-40 minutes until toothpick comes out clean (If you use a large bread pan you will need to up the cooking time to 55 minutes).

Store in the fridge, if you like it cold. If you prefer it hot, you can put a slice in the microwave for 25 seconds.

Monday, August 6, 2007

The Barbarian in me


Warm Chocolate Tart, originally uploaded by mud pie gourmet.

My stomach is divided in two. One side is for breakfast/lunch/dinner, the other side is for dessert. I was taught this theory when I was about 4 years old and it stuck. My brother-in-law, Dr. Dan would probably tell me it is scientifically impossible, but I truly believe mine is. I ALWAYS have room for dessert.

I have been at many restaurants, having a civilized dinner (usually the ones without my kids), having civilized conversation, but when dessert comes I turn into a barbarian (some might disagree that I am civilized the whole time because I usually begin a meal by sweeping my hair up into a pony-tail so that it doesn't get in my way as I plow through my food). I have actually fought friends and family over the last piece of dessert. Maybe I should learn my lesson and always buy my own. Here's a chocolate tart that you, too will fight over. My advice? Eat it slow and savor each bite (for the record, my sister told me the reason she is a little skinner than me is because she eats a lot slower than I do and knows when she's full. I guess I should listen, but sometimes I have to beat whomever is sharing with me!)

Warm Chocolate Tart

adapted from epicurious.com
Serves 8

Crust
1 cup all purpose flour
3 tablespoons sugar
1/8 teaspoon salt
1/2 cup (1 stick) unsalted butter, cut into 1/2-inch pieces
1 large egg yolk
1/2 teaspoon vanilla extract

Filling
1/2 cup whipping cream
4 tablespoons whole milk
4 ounces bittersweet (not unsweetened) or semisweet chocolate, chopped
1 large eggs
1/3 cup sugar
Pinch of salt

Make crust:
Blend flour, sugar, and salt in processor 5 seconds. Add butter, yolk and vanilla and process until large moist clumps form. Gather dough into ball; knead briefly to combine well. Flatten into disk. Wrap in plastic; chill until firm enough to roll, about 30 minutes (sometimes I speed up the process by putting in the freezer for 10 minutes).

Preheat oven to 400°F. Roll out dough between sheets of plastic wrap to 11- to 12-inch round. Peel off top sheet of plastic. Turn dough over; press into 9-inch-diameter tart pan with removable bottom. Peel off plastic. Fold in any excess dough, forming double-thick sides. Pierce crust all over with fork. Freeze 15 minutes.

Bake crust 10 minutes. Using back side of fork, press crust flat if bottom bubbles. continue to bake until crust is golden, about 5-10 minutes (crust sides may shrink slightly.) Transfer to rack and cool.

Lower temperature to 350°F.

For filling:
Bring whipping cream and milk to boil in heavy medium saucepan. Remove from heat. Add
chocolate; whisk until melted and smooth. Whisk eggs, sugar, and salt in large bowl to blend. Gradually whisk chocolate mixture into egg mixture. Pour filling into warm crust.

Bake tart until filling is set in center and puffed at edges, about 20-25 minutes. Transfer to rack and let cool 15 minutes. Serve warm. (Can be prepared up to 1 day ahead. Cool completely, then cover and refrigerate. Before serving, reheat in 350°F oven 10 minutes or microwave individual slices at 5-second intervals until warm.)